Unity 에 광고를 달수 있는 Vungle SDK를 Import 해보겠습니다.
Unity Vungle SDK 최신 다운로드 주소 : https://publisher.vungle.com/sdk/plugins/unity
Vungle 사용방법은 아래 샘플코드 받아서 열어보시면 자세히 나와있습니다.
Vungle 샘플코드 다운주소 : https://github.com/Vungle/Unity-Plugin/tree/sdk6
Vungle/Unity-Plugin
Vungle's Unity Plugin. Contribute to Vungle/Unity-Plugin development by creating an account on GitHub.
github.com
다운 받아서 압축풀고
Unity-Plugin-sdk6\Unity-Plugin-sdk6\Sample\Unity Sample Application\Assets\MainTitleScreen.unity 클릭해서 유니티에서 열어주자.
열때 설치된 유니티 버전이 틀리다고 나오는데 그냥 OK 눌러주고 프로젝트를 오픈한다.
오픈하고 나면 코드 에러가 발생되는데 이때
Unity-Plugin-sdk6\Unity-Plugin-sdk6\VunglePlugin-6.3.0.unitypackage 이거 Import 해주면 에러는 사라진다.
아래 코드 열어보면 사용법이 쉽게 나와있다.
Unity-Plugin-sdk6\Unity-Plugin-sdk6\Sample\Unity Sample Application\Assets\TitleGUI.cs
using UnityEngine;
using System.Collections;
using System.Collections.Generic;
using UnityEngine.UI;

// To ensure proper behavior of the Vungle SDK, please target an iOS, Android, or Windows platform in the Unity Editor.
public class TitleGUI : MonoBehaviour {
#if UNITY_IPHONE || UNITY_ANDROID || UNITY_WSA_10_0 || UNITY_WINRT_8_1 || UNITY_METRO

	// These AppIDs point to Vungle test applications on the dashboard.
	// Replace these with your own AppIDs to test your app's dashboard settings.
	string iOSAppID = "5912326f0e96c1a540000014";
	string androidAppID = "591236625b2480ac40000028";
	string windowsAppID = "59792a4f057243276200298a";

	// These PlacementIDs point to Vungle test applications on the dashboard.
	// Replace these with your own PlacementIDs to test your placements' dashboard settings.
#if UNITY_IPHONE
	Dictionary<string, bool> placements = new Dictionary<string, bool>
	{
		{ "DEFAULT63997", false },
		{ "PLMT02I58266", false },
		{ "PLMT03R65406", false }
	};
#elif UNITY_ANDROID
	Dictionary<string, bool> placements = new Dictionary<string, bool>
	{
		{ "DEFAULT18080", false },
		{ "PLMT02I58745", false },
		{ "PLMT03R02739", false }
	};
#elif UNITY_WSA_10_0 || UNITY_WINRT_8_1 || UNITY_METRO
	Dictionary<string, bool> placements = new Dictionary<string, bool>
	{
		{ "DEFAULT18154", false },
		{ "PLACEME92007", false },
		{ "REWARDP93292", false }
	};
#endif

	public Button initSDKButton;
	public Button playPlacement1Button;
	public Button loadPlacement2Button;
	public Button playPlacement2Button;
	public Button loadPlacement3Button;
	public Button playPlacement3Button;
	public Text appIDText;
	public Text placementID1Text;
	public Text placementID2Text;
	public Text placementID3Text;

	List<string> placementIdList;

	bool adInited = false;


	void Start () {
		SetupButtonsAndText();
	}


	void Update () {
		updateButtonState ();
	}


	void OnApplicationPause(bool pauseStatus) {
		if (pauseStatus) {
			Vungle.onPause ();
		} else {
			Vungle.onResume ();
		}
	}


	// UI initialization
	void SetupButtonsAndText () {
		placementIdList = new List<string>(placements.Keys);
		string appID;

#if UNITY_IPHONE
		appID = iOSAppID;
#elif UNITY_ANDROID
		appID = androidAppID;
#elif UNITY_WSA_10_0 || UNITY_WINRT_8_1 || UNITY_METRO
		appID = windowsAppID;
#endif

		appIDText.text = "App ID: " + appID;
		placementID1Text.text = "Placement ID: " + placementIdList [0];
		placementID2Text.text = "Placement ID: " + placementIdList [1];
		placementID3Text.text = "Placement ID: " + placementIdList [2];

		initSDKButton.onClick.AddListener (onInitButton);
		initSDKButton.interactable = true;
		playPlacement1Button.onClick.AddListener (onPlayPlacement1);
		loadPlacement2Button.onClick.AddListener (onLoadPlacement2);
		playPlacement2Button.onClick.AddListener (onPlayPlacement2);
		loadPlacement3Button.onClick.AddListener (onLoadPlacement3);
		playPlacement3Button.onClick.AddListener (onPlayPlacement3);
	}


	// Vungle SDK initialization
	// Uses an AppID for iOS, Android, or Windows depending on platform
	void onInitButton() {
		DebugLog("Initializing the Vungle SDK");

		initSDKButton.interactable = false;
		string appID;

#if UNITY_IPHONE
		appID = iOSAppID;
#elif UNITY_ANDROID
		appID = androidAppID;
#elif UNITY_WSA_10_0 || UNITY_WINRT_8_1 || UNITY_METRO
		appID = windowsAppID;
#endif

		// As of 6.3.0 Vungle Unity Plugin no longer requires placement IDs on startup
		Vungle.init(appID);
		initializeEventHandlers ();
	}


	void onPlayPlacement1 () {
		Vungle.playAd(placementIdList[0]);
	}


	void onLoadPlacement2 () {
		Vungle.loadAd(placementIdList[1]);
	}


	void onPlayPlacement2 () {
		// option to change orientation
		Dictionary<string, object> options = new Dictionary<string, object> ();
#if UNITY_IPHONE
		options ["orientation"] = 5;
#else
		options ["orientation"] = true;
#endif

		Vungle.playAd(options, placementIdList[1]);
	}


	void onLoadPlacement3 () {
		Vungle.loadAd(placementIdList[2]);
	}


	void onPlayPlacement3 () {
		// option to customize alert window and send user_id
		Dictionary<string, object> options = new Dictionary<string, object> ();
		options ["userTag"] = "test_user_id";
		options ["alertTitle"] = "Careful!";
		options ["alertText"] = "If the video isn't completed you won't get your reward! Are you sure you want to close early?";
		options ["closeText"] = "Close";
		options ["continueText"] = "Keep Watching";

		Vungle.playAd(options, placementIdList[2]);
	}


	// Manual implementation of GDPR compliance code
	// To use, attach this function to a button click event
	/*
	void onConsentButton() {
		if(consentState == Vungle.Consent.Accepted) {
			consentState = Vungle.Consent.Denied;
			consentButton.gameObject.GetComponent<Image>().color = Color.red;
			Vungle.updateConsentStatus(consentState);
		}
		else {
			consentState = Vungle.Consent.Accepted;
			consentButton.gameObject.GetComponent<Image>().color = Color.green;
			Vungle.updateConsentStatus(consentState);
		}

		// Can also set a message sent with all traffic for GDPR versioning
		// string message = "custom_message";
		// Vungle.updateConsentStatus(consentState, message);
	}
	*/


	void updateButtonState() {
		playPlacement1Button.interactable = placements[placementIdList[0]];
		loadPlacement2Button.interactable = adInited & !placements[placementIdList[1]];
		playPlacement2Button.interactable = placements[placementIdList[1]];
		loadPlacement3Button.interactable = adInited & !placements[placementIdList[2]];
		playPlacement3Button.interactable = placements[placementIdList[2]];
	}


	// Setup EventHandlers for all available Vungle events
	void initializeEventHandlers() {

		// Event triggered during when an ad is about to be played
		Vungle.onAdStartedEvent += (placementID) => {
			DebugLog ("Ad " + placementID + " is starting!  Pause your game  animation or sound here.");
		};

		// Event is triggered when a Vungle ad finished and provides the entire information about this event
		// These can be used to determine how much of the video the user viewed, if they skipped the ad early, etc.
		Vungle.onAdFinishedEvent += (placementID, args) => {
			DebugLog ("Ad finished - placementID " + placementID + ", was call to action clicked:" + args.WasCallToActionClicked +  ", is completed view:"
				+ args.IsCompletedView);
		};

		// Event is triggered when the ad's playable state has been changed
		// It can be used to enable certain functionality only accessible when ad plays are available
		Vungle.adPlayableEvent += (placementID, adPlayable) => {
			DebugLog ("Ad's playable state has been changed! placementID " + placementID + ". Now: " + adPlayable);
			placements[placementID] = adPlayable;
		};

		//Fired initialize event from sdk
		Vungle.onInitializeEvent += () => {
			adInited = true;
			DebugLog ("SDK initialized");
		};

		// Other events
		/*
		//Vungle.onLogEvent += (log) => {
			DebugLog ("Log: " + log);
		};

		Vungle.onPlacementPreparedEvent += (placementID, bidToken) => {
		    DebugLog ("<onPlacementPreparedEvent> Placement Ad is prepared with bidToken! " + placementID + " " + bidToken);
		};

		Vungle.onVungleCreativeEvent += (placementID, creativeID) => {
		    DebugLog ("<onVungleCreativeEvent> Placement Ad is about to play with creative ID " + placementID + " " + creativeID);
		};
		*/
	}

	/* Common method for ensuring logging messages have the same format */
	void DebugLog(string message) {
		Debug.Log("VungleUnitySample " + System.DateTime.Today +": " + message);
	}
#endif
}
코드에 보면 PlacementID 값이 있는데 이거는 https://publisher.vungle.com/ 사이트에 가서 자기 프로젝트에 맞게 설정해줘야한다.
사이트에서 플랫폼에 맞게 프로젝트를 생성하면 AppID가 생성되는데 코드에 넣어주면됨.
그리고 아래와 같이 플레이스먼트 ID도 생성해야한다.
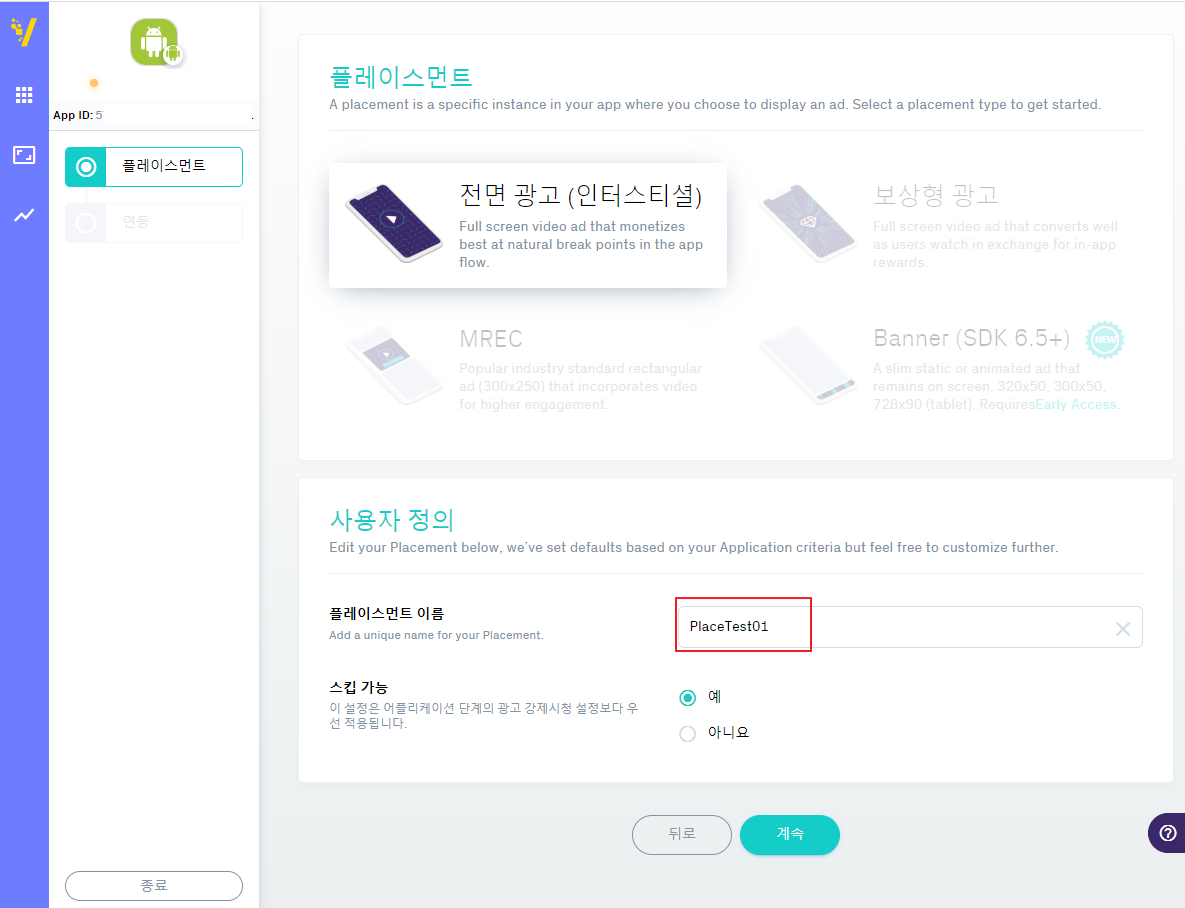
이렇게 생성하고 나면 PlaceTest01-1234167 이런식으로 ID값이 생성되는데 해당 값을 코드에 넣어주면된다.
*참고로 광고 테스트 할때는 아래와 같이 테스트 ID를 넣은 후 해당 기기로만 테스트 하시기 바랍니다.


댓글